Audio Video
Dates
End of September/early October equipment is ready to be tested
Video Team
Members
- Tan Issaro,
- Anagarika Egle and
- Anagarika Deepa,
Responsibility
- Setting up the camera in the new Sala (high priority)
- Starting with one camera, possibly able to be mounted on two location?
- Connecting the camera to the network for live-streaming
- Connecting the camera to the recorder for video editor (add to buying list)
- Establishing a routine for the video officer and video editor and their operation
- Who will be in charge or operating, editing, posting, etc.
- Documenting the procedures
- Setting up the lighting (high priority)
- Setting up the AV room and Camera cupboard with all the items needed (work with audio team)
- Furnitures,
- Shelving
- etc.
- Setting up the projector (Tan Jalito)
- We need to buy the projector (ultra short through doesn't have to be, but seems to be a good option)
- Electric Sockets are on the walls
- Video sockets?
- Ethernet socket?
- Contractor provide up to the socket (ceiling speakers are included)
- Screen is already installed, remote to control it. (should be fixed to the wall)
- Documenting the process of recording etc.
- Training other member of the community how to use and do the process
- Thinking about the routine, who is responsible for operating the process
Budget
- There is a budget to buy equipment and furniture
Specs
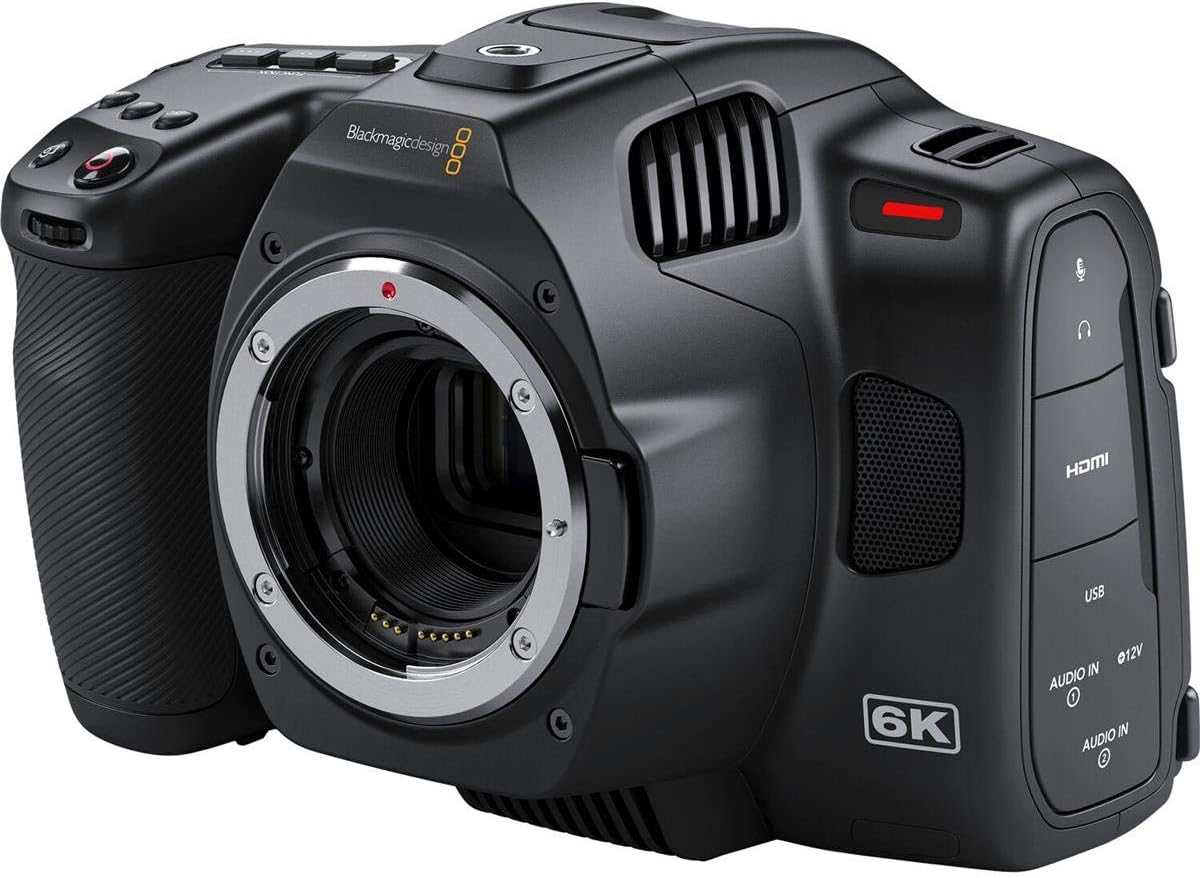
BLACKMAGIC 6K PRO WORKFLOW:
Checklist for Recording Day:
|
STEPS |
COMMENTS/ HOW TO.. |
|
On the ground: |
|
|
1. Turn on Nano II Controller Wheel; 2. Turn on Bluetooth |
1.2 Press Rec button for couple of seconds; 1.2 Bluetooth or 🏠 icon -> Connection -> ON -> Settings -> Search and tap on Camera's code -> ✅️ -> Confirm. |
|
3. Turn On External Monitor and Atem (if needed). |
|
|
On the Ladders: |
|
|
4. Power on Camera and Pan/Tilt |
4.1 Make sure power is on 🔌. 4.2 Turn On camera manually. |
|
5. Connect Focus motor to External Power bank |
Make sure that Motor has purple colour on and is connected to the Wheel. Calibrate motor if needed. |
|
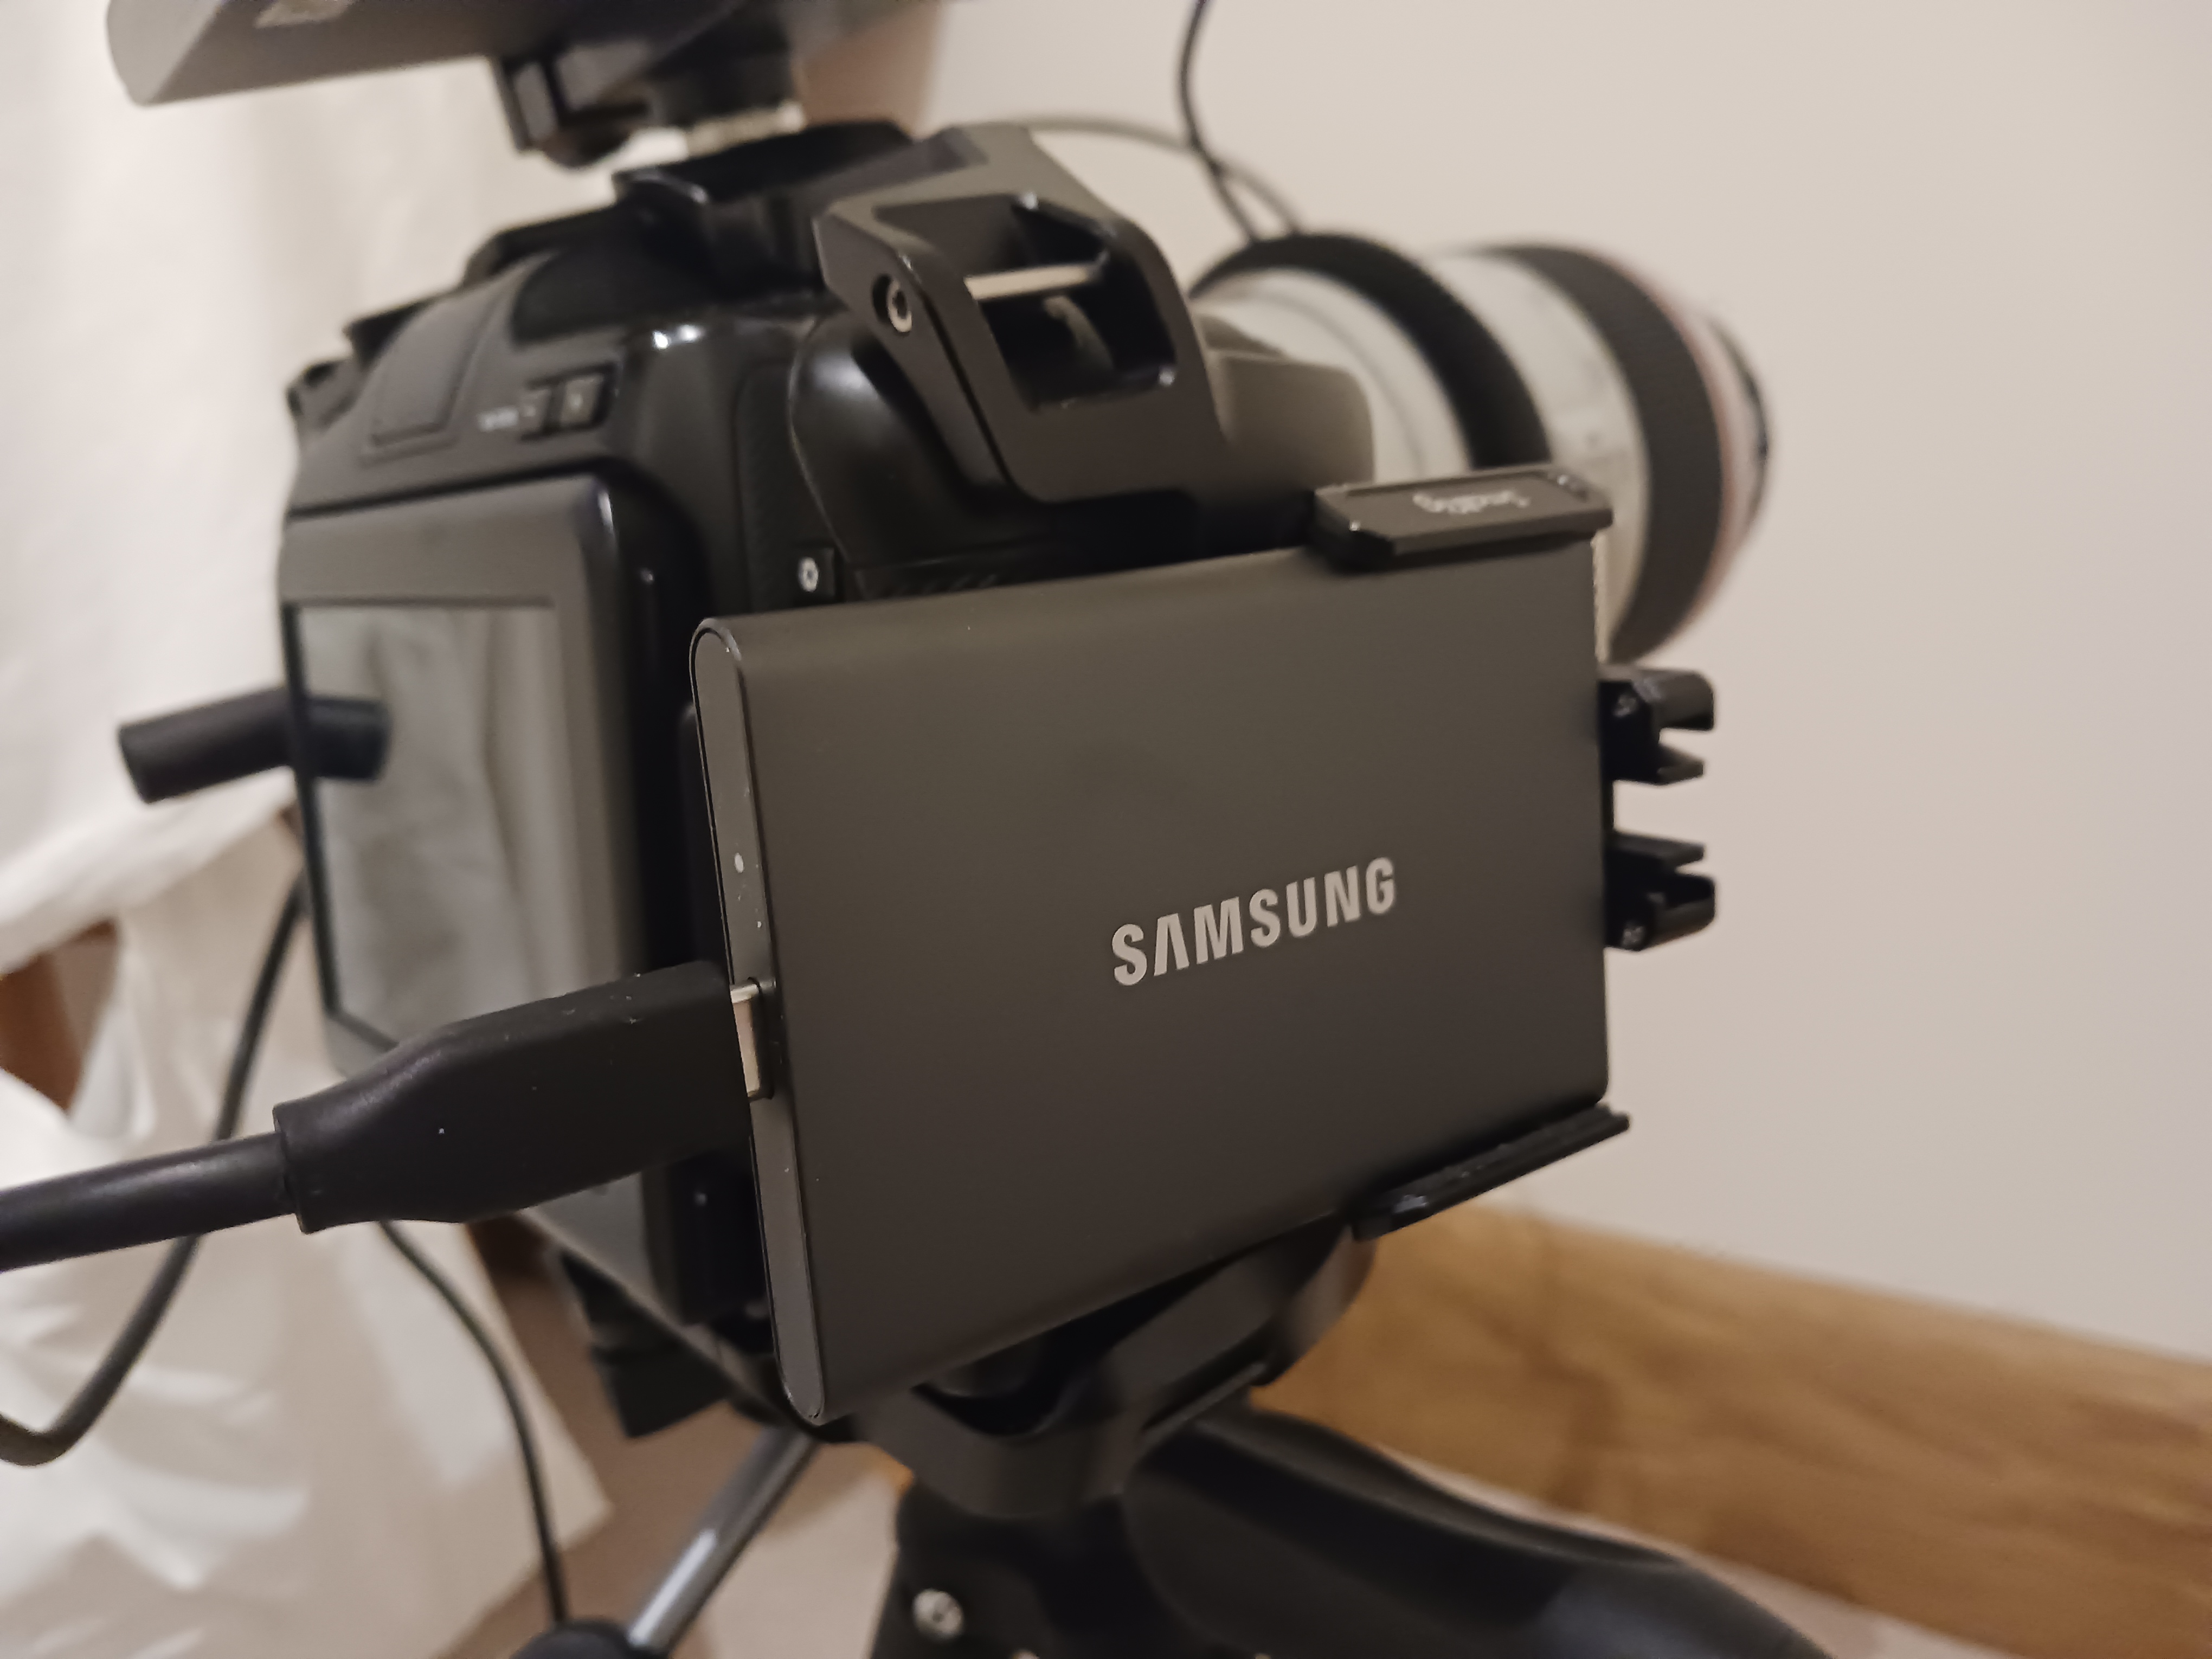
6. Connect External Hard Drive |
Use USB cable connected to Camera. |
|
7. Remove lens cap |
|
|
8. Review all cables connected to camera and Pan / Tilt. |
HDMI; USB; Audio; Power supply adaptors. |
|
On the ground: |
|
|
9. On External Monitor check if camera’s position is correct. |
Use a SYRP app on iPad to addict camera’s position if needed. Make sure focus is correct. |
|
10. Start Recording |
Press Rec button |
|
11. Stop recording |
Again Press Rec button |
|
12. Turn Off Nano II Controller Wheel; External monitor and Atem |
|
|
On the Ladders: |
|
|
13. Turn Off Camera; Disconnect Motor from Power bank (USB); Remove External Hard drive (USB) |
|
|
14. Put on Lens cap |
|
|
15. Turn Off Power supply adaptors (Camera and Pan / Tilt) |
|
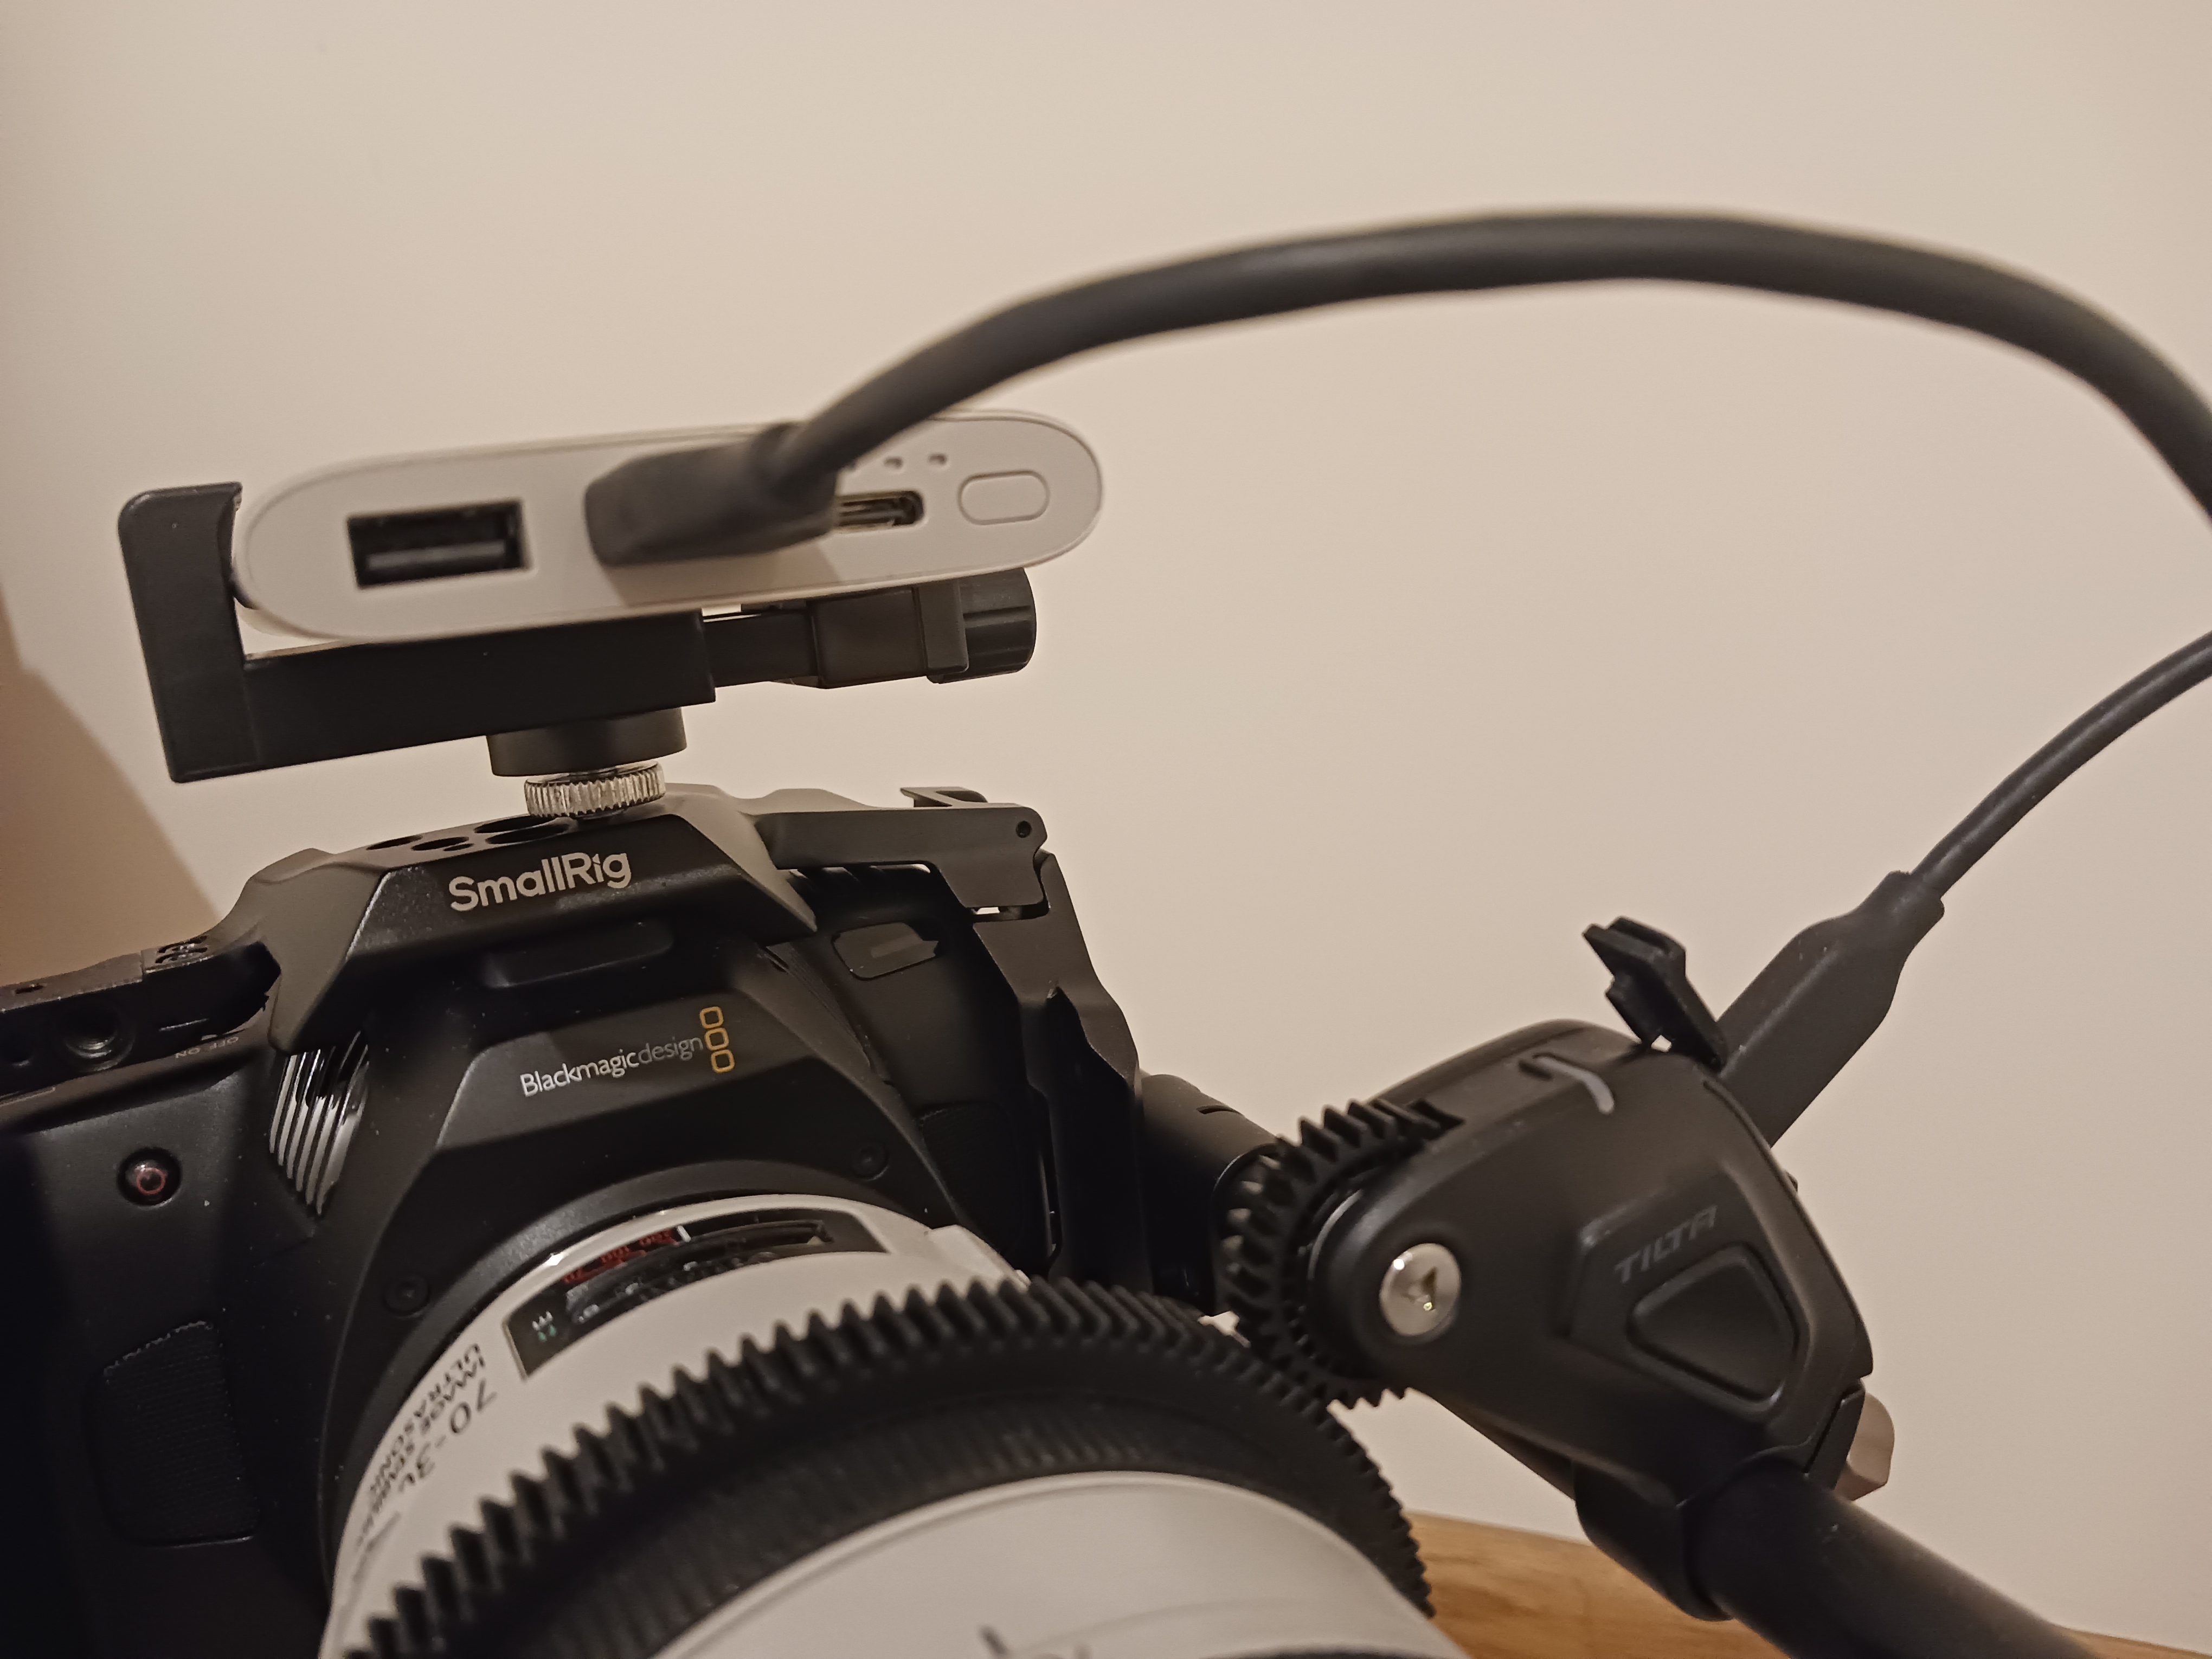
Equipment List
- BMPCC 6K Pro Camera
- Canon 70-300mm Lens (EF mount)
- Tilta Nucleus Nano II Follow Focus System
- Rod Baseplate
- 15-300 mm Rod (for mounting follow focus motor)
- Power Solutions (Power supply adaptor for camera; External power bank for Motor)
- External Monitor
- External Power bank (for the motor)
- Pan / Tilt
- Dove plate (for camera balance)
- USB (x3) / HDMI (x2) cables
- ATEM MINI PRO (for lifstreem)
- Laptop (for lifestreem and camera, bluetooth and Atem softwares/apps)
- Base to secure Pan / Tilt
- Chain to secure camera
SETUP STEPS:
1. Lens Mounting
- Attach the Canon 70-300mm lens to the BMPCC 6K Pro’s EF mount.
- Use dove plate to balance camera or/and lens support bracket to stabilize the lens. The 70-300mm can be front-heavy, which might strain the camera mount.
2. Add Rod Support System
- Attach a 15mm rod baseplate to the camera.
- Insert 15-300 mm rods and adjust their length to accommodate the follow focus and zoom motors.
3. Follow Focus Motor Setup
- Mount the Tilta Nucleus Nano II motor onto rod. Position it to the focus ring on lens.
- Attach the focus gear ring (included with the Tilta system) around the lens’s focus ring. Ensure it is snug and properly aligned with the motor's gear.
- Secure the motor so that the gear teeth mesh with the focus ring teeth. Avoid overtightening to prevent slippage or damage.
4. Powering the Follow Focus
- Connect the Nucleus Nano II motor to the External Power Bank via USB-C cable (attached on top of the camera).
5. Calibrate the Follow Focus
- Connect Motor to Power Bank;
- Power on the Nucleus Nano II system:
- On the weel tap on A/B tag; tap on Connect tag; tap on 2.4G 'ON'; go to CHANNELS sellect manual and search.
- Press the motor twice and make sure there is a purple color for focus and (if using) blue color for zoom on second motor.
- On weel select the motor model that appear on the screen.
6. Connect camera and Nano II weel to Bluetooth (for camera settings control)
7. Camera Configuration
- Adjust your BMPCC settings:
- Set your desired resolution (6K, 4K, etc.).
- adjust ISO/ Shutter speed, White balance;
- Select a crop factor if needed to achieve a more manageable field of view with the 70-300mm lens.
- Enable focus assist features (e.g., focus peaking) for better visualization.
- Make sure that Bluetooth is on.
8. Power Management
- Use power adaptors for Camera and Pan / Tilt and the External Power Bank for the Motor.
- Monitor power levels of Power Bank and Nano II weel.
WEEKLY WORKFLOW:
1. Pre-Shoot Preparation (on ladders)
- Charge Batteries:
- Ensure the camera, Nucleus Nano II motor, and Syrp Genie system are connected to reliable power sources.
- Lens Check:
- Take off lens lid.
- Clean the lens with a microfiber cloth.
- Check the lens’s zoom and focus are still correctly positioned (markings on lens).
- Verify Focus Calibration:
- On the Tilta controller weel, confirm that the focus motor calibration matches the pre-set position for the speaker.
2. Camera Visual Alignment
- Turn on the BMPCC 6K Pro and connect Motor to External Power Bank and SD Hard drive to camera via USB cabels.
- Verify the frame alignment with the podium or seat where the speaker will be.
- Focus Motor Check:
- If the focus motor needs recalibration, perform it now. Use the Tilta Nano II controller to re-align.
- Lock the Setup:
- Ensure the pan/tilt system is level, and all screws are tightened
- Climb Down.
3. Adjusting Pan/Tilt from iPad (if needed)
- Use the Syrp Genie app to fine-tune pan and tilt settings remotely:
- Position the speaker at the center of the frame.
- Ensure the background is properly composed.
4. Pre-Recording Checklist
- Sound Check:
- Verify audio setup (external microphone or camera’s audio input).
- Test audio levels to ensure clarity.
- Camera Settings:
- Confirm resolution and frame rate settings (e.g., 4k ProRes at 25fps or your preferred format).
- Enable focus peaking (if monitoring focus) and false color (to check exposure).
- Lock white balance and ISO settings based on the room’s lighting conditions.
- Remote Control Verification:
- Test the remote start/stop function on the BMPCC app or Syrp Genie app.
- Rehearsal:
- Ask someone to sit in the speaker’s position to verify framing and focus.
5. Recording
- Begin recording using Nano II controller weel
- Monitor the feed during recording (via an external monitor or app) to ensure no interruptions during the lifestream.
- Use the Nano II focus controller if adjustments are required mid-session.
6. Post-Recording
- Stop recording via Nano II controller weel.
- Back up footage immediately to an external SD hard drive or app on computer
End-of-Day Routine (on ladders)
- Power down all equipment.
- Cover the camera and lens with a dust protector.
- Check Power bank and Nano II controller weel if need to recharge for the next session.
- Store the Tilta Nano II controller and other peripherals securely.
Troubleshooting Notes
- If the focus motor frequently loses calibration, consider marking the focus ring on the lens to quickly reset it.
- If the Syrp Genie app loses connection, reconnect via Bluetooth and reset the pan/tilt alignment.
- For backup, keep a step-by-step checklist accessible near the recording location.
This workflow ensures minimal manual adjustments while maximizing control through remote apps and maintaining consistency for weekly Dhamma talks.
Tan Jalito's comments
- No portable equipment (easy training, low maintenance)
- Preferable fix, stationary equipment.
- Many cons to portable.
- Camera for Sunday talks, rarely used (12 a year)
- Another camera for different angles to record Anumodana?
- Temple PTZ camera works well and is easy to use (saves presets but is expensive)
Tan Issaro's comments
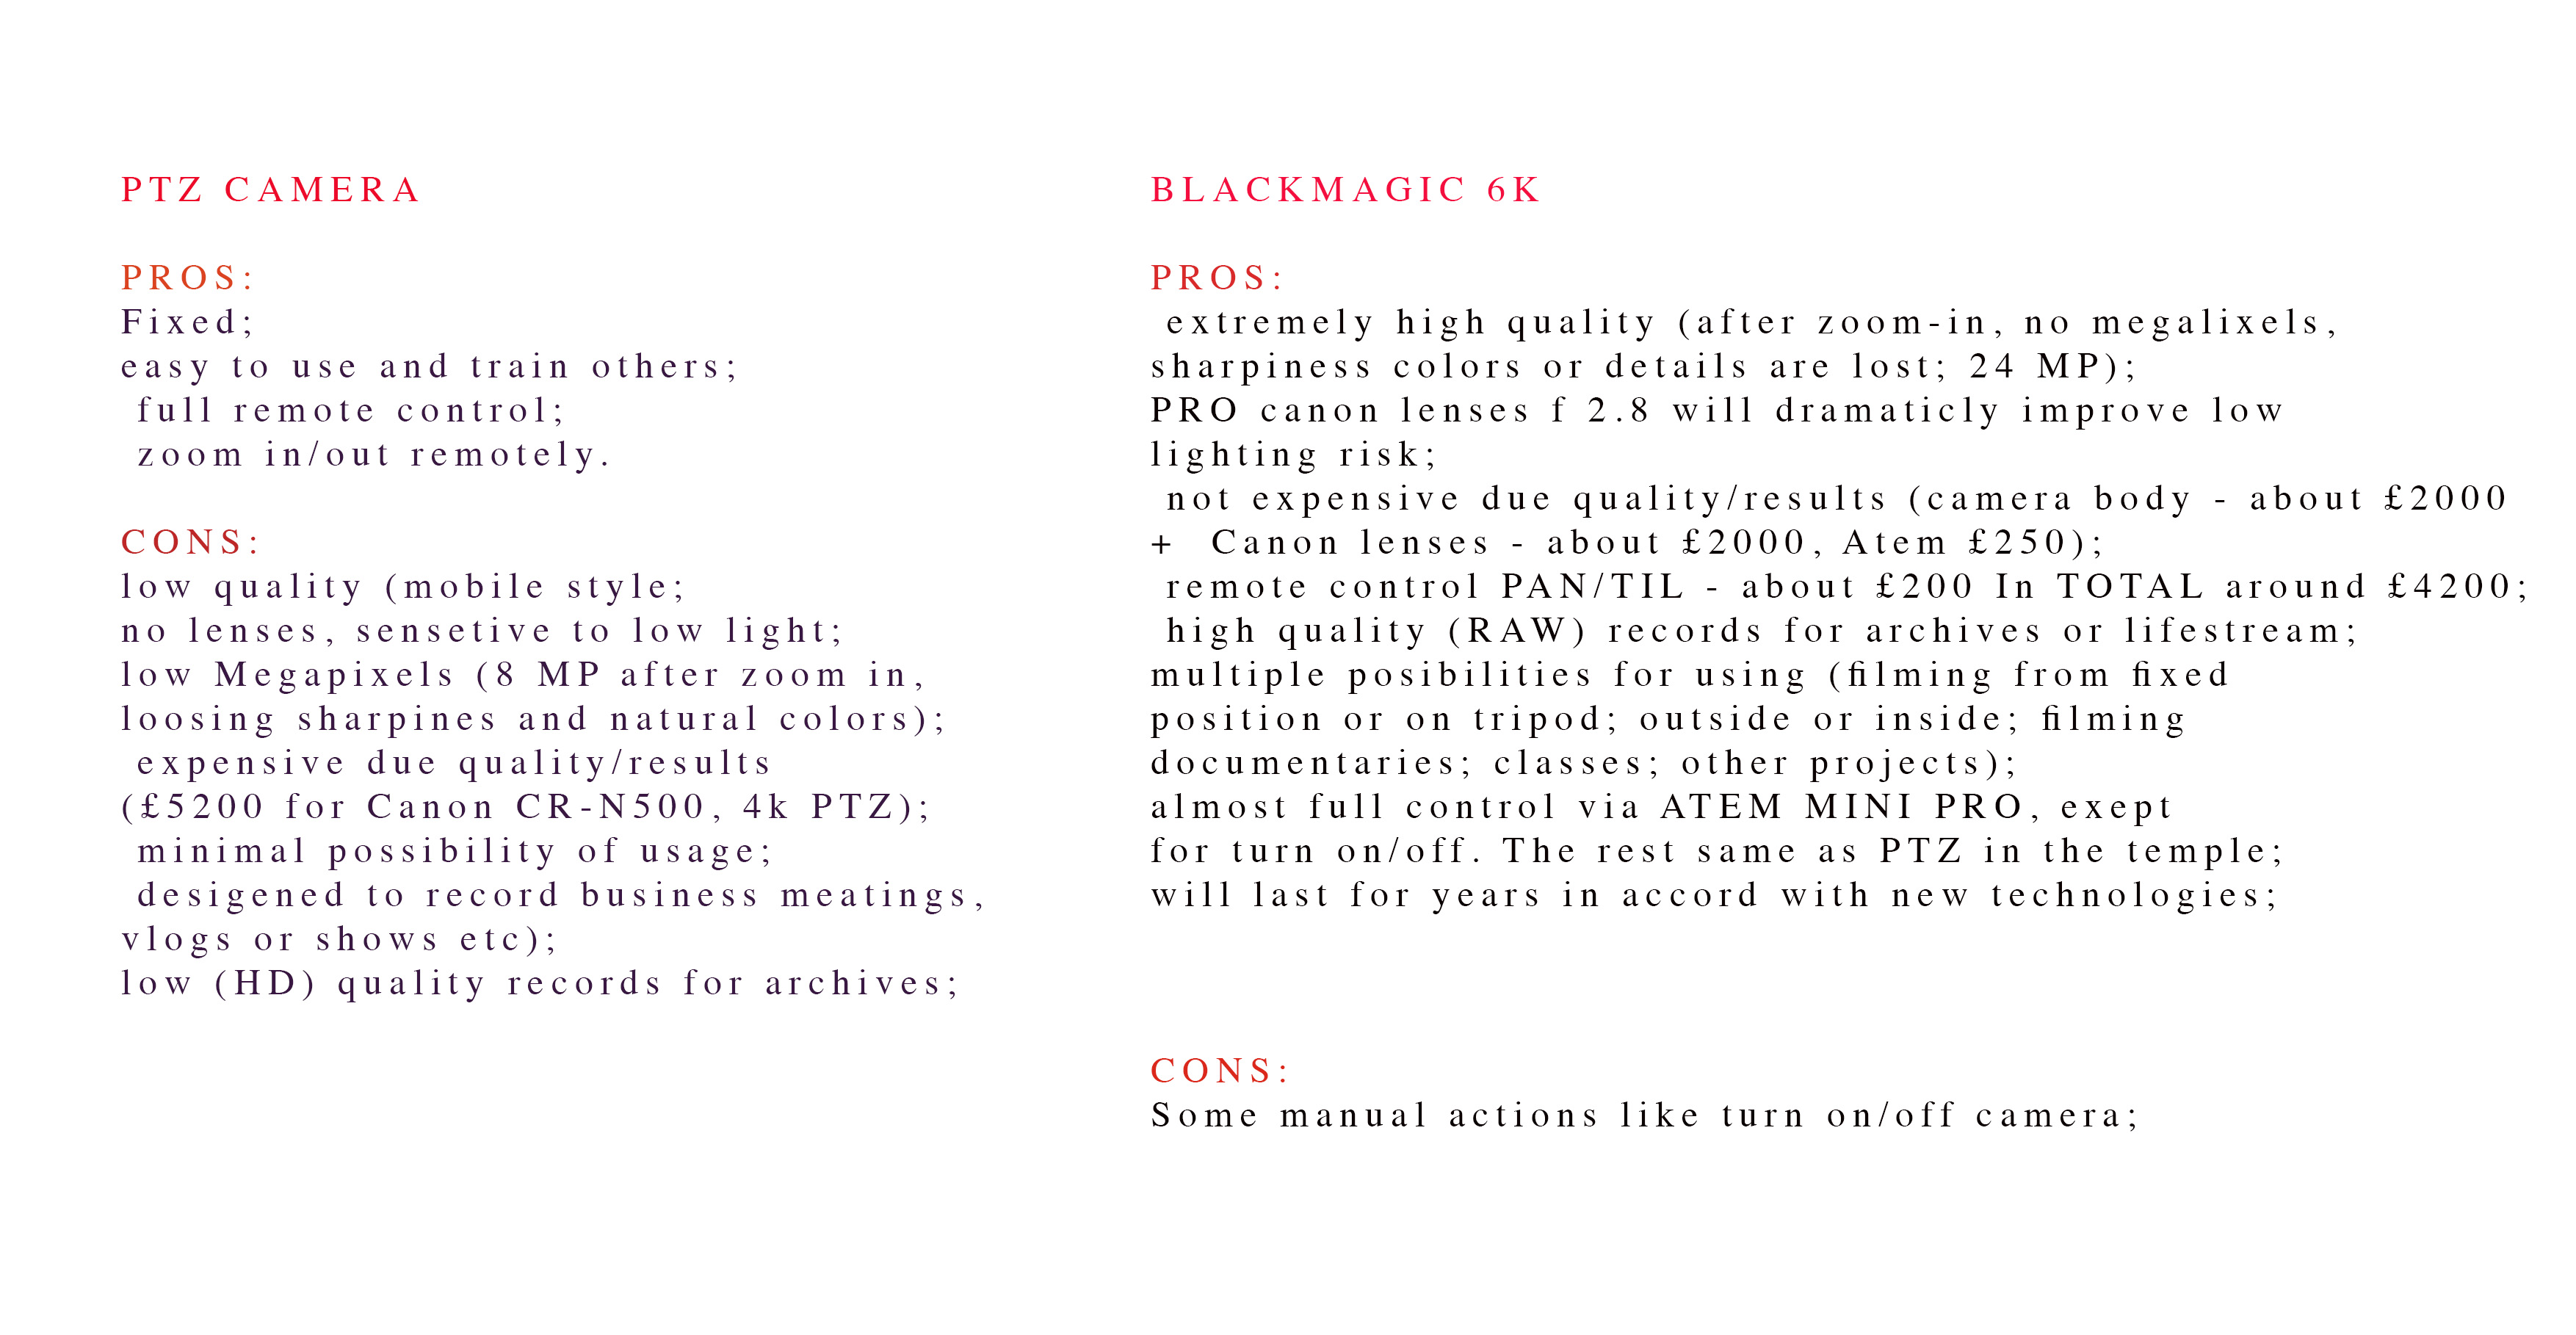
Advantages of using the PTZ Canon camera:
- remote control allows for easy operation by everyone (no need for manual adjustment)
- easy and convenient set-up (extension lead’s power button switches the camera)
- FHD video recording gives good quality result
Disadvantages of using the PTZ Canon camera:
- the cost of camera, screen and ATEM Mini Pro is 5500£
- small sensor size for this price 1” (13.2 x 8.8mm)
Advantages of using Pocket Blackmagic Design camera:
- amazing quality (bokeh and sharpness) due to bigger sensor APS-C (23.10 x 12.99mm)
- portable, can be used on other occasions (i.e. as a second camera in the Temple)
- good price (much lower than PTZ camera) for the quality it delivers
Disadvantages of using Pocket Blackmagic Design camera:
- a more complicated setup might involve having a laptop to control zoom,
and other settings in the camera, via Blackmagic software. (There is a ipad app that make it easy) - needs to be switched on and off manually by climbing the ladder (What about this)
An Egle's comments:
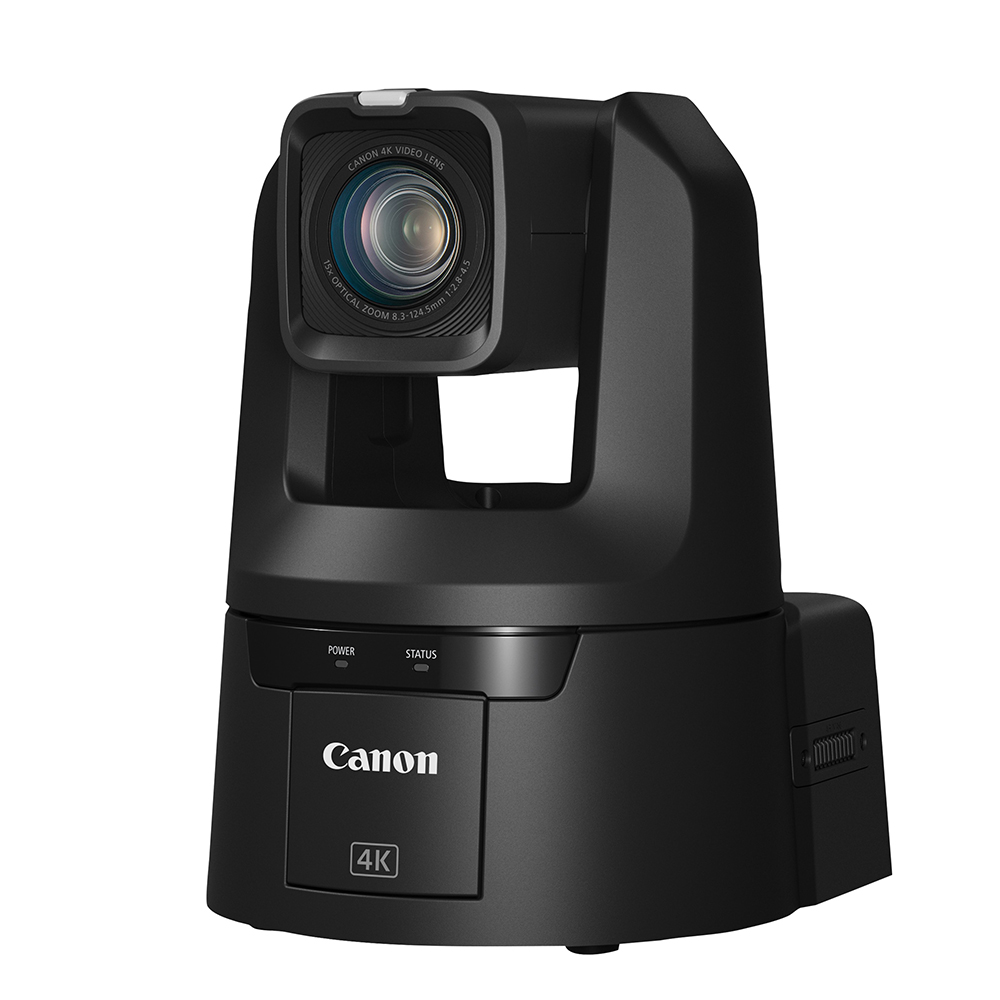 PTZ camera 4K (Canon) - 5100£
 Pocket camera 6K (BlackMagic) - 2000£
Black Magick 6k MANUAL:
https://documents.blackmagicdesign.com/UserManuals/BlackmagicCinemaCameraManual.pdf
best opption for wireless control: TILTA NUCLEUS NANO II (for remote control zoom and focus):
MANUAL: Nucleus-Nano-II-User-Guide-20230912.pdf
https://www.youtube.com/watch?v=_gnZQTpzTVk
BM file sizes:
BM remote control via ATEM:
https://www.youtube.com/watch?v=5XZYZQJCmb4&t=3s
Full remote zoom control via ATEM:
https://www.youtube.com/watch?v=uoPz1is1bCY&list=LL&index=3
CAMERA TEST (an estimated date 30th of September) EQUIPMENT:
- Camera - delivered
- lenses - we have 3 x prime (24mm / 35mm / 85mm cinema lenses + canon 24-105mm)
- lenses adapter - to be ordered (An. Deepa)
- tripod - borrow from Monastery (Tan Issaro)
- ATEM mini Pro - borrow from Monastery (Tan Issaro)
- Internet - Tan Cittadhammo ??
- Ipad or laptop - Tan Cittadhammo ??
- ladders - should be in sala (to check with Rachaya)
- 2 x table (one for tripod and atem + ipad) - borrow from the kitchen (An Egle)
Audio Team
Members
- T. Issaro
- T. Jalito
- T. Karunno
Responsibility
- Setting up and test the audio equipment that is necessary to do the PA from the different locations:
- In front of the main shrine
- In front of the secondary shrine (niche)
- In the monk eating area
- In the cloister
- Note: in our current contract with Jigsaw, they have to provide the complete installation and even a demonstration of the product.
- Setting up the audio equipment that is necessary to record Dhamma talks (check with video team above)
- Setting up the AV room and Audio cupboard with all the items needed (work with video team)
- Furnitures,
- Shelving
- etc.
Budget
- There is a budget to buy equipment and furniture
Specs
Notes
- Suggestions were given for the construction and separation of the (currently) shared cupboard space in the Monks Eating Area, to separate the audio equipment space from the cushion storage space. This is to ensure that the dust from the cushion storage does not have a negative impact on the life expectancy of the electronics (especially the rotary/linear pots on the mixer) in the audio equipment.
- Another suggestion was a change of the location for the audio inputs/outputs for the Cloister, thereby connecting the audio from the Temple, Sala and the Outdoor areas. Something that was not practically feasible before. (see point 6)
- The dual mic is digital, and it would be better to have radio UHF one less prone to interference
[Q] Can we remove it from the list and buy it ourselves, we would choose Shure GLXD24R+/SM58 instead
See Mics for more information - Warranty, how do we manage? [Q]
- Suggestions for the cloister audio mixer that link the temple and the Sala (by Tan Karunno)
For the cloister audio mixer, Tan Karunno propose to buyYamaha MG10 10-Channel Mixer from:
- https://www.musicmatter.co.uk/yamaha-mg10
- https://www.pmtonline.co.uk/yamaha-mg10-mixing-desk
- https://www.gak.co.uk/en/yamaha-mg10-mixer/93163
Also, note that Microphone cables are not on any list so far.
Projector
Note
- [Q] we have to provide the projector ourselves
- [Q] target budget
- 3 Options
- Long distance projector mounted on the opposite wall
- Ultra Short throw mounted at the top of the screen
- Ultra Short throw as a portable unit that sits in front of the screen when needed (with small cart)
- Need a place to store the projector and the cart.
- Can we move the screen to the right?
Long range projectors
- this has the right trough ratio [Throw Ratio: 4.6 – 7.2]
- Good selection here
- Optoma X605e Projector
- Optoma-EH500
- EB-2250U
- NEC PV710UL-W1-13ZL


Short throw
- Epson EB-770F (£1,428.00)
- Epson LS800 (£2,992.80)
Documents
‘Acoustic - Public Announcement System’ Drive Folder

Audio & Video proposal - 6s
T. Narindo and T. Jalito (25 November 2021)
Proposal_ AV Sala - project 6s.pdf

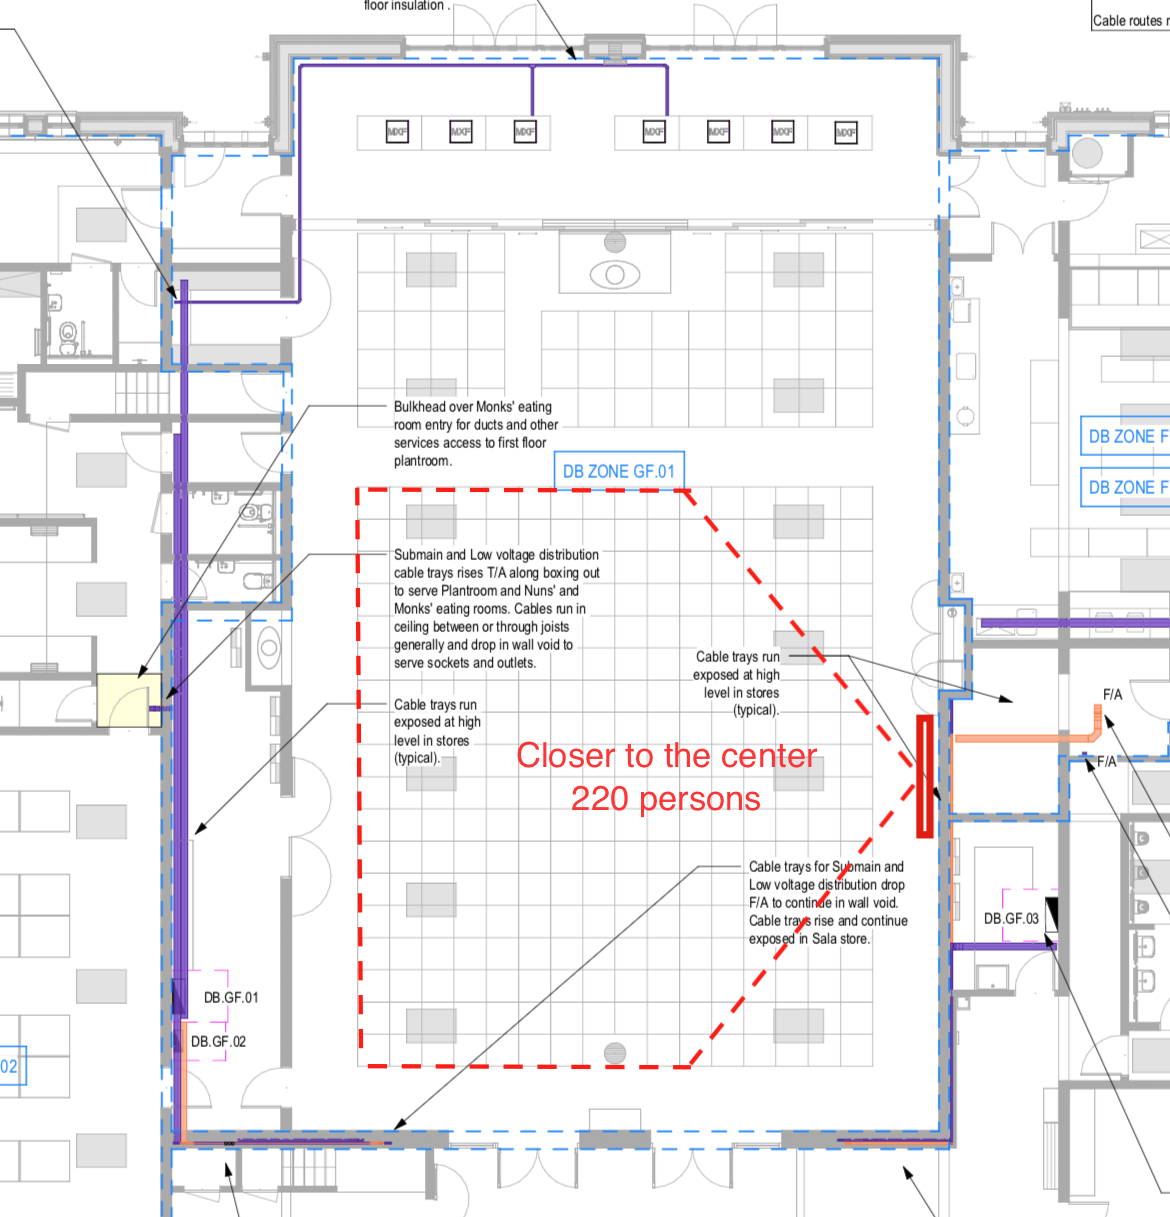
Plans
Screen
What is the quality of the screen? Is it good enough for Ultra Short Throw?

The room is 15m wide wall to wall
AV Store
Drawing for the AV rack in the AV room

Comments:
- The only thing that comes to mind for the audio part is that it would be useful if the audio rack/cabinet had a front door with a clear see-through panel. A 19-inch rack with a glass door keeps the internal environment dust free. And since this is an installation, this would seem appropriate here.
- Furman Power Conditioner for the audio rack. (Tan Karunno)
I assume the Sound Engineer has already thought about this, but just to be sure; a Furman Power Conditioner makes sure that the power supply for the rack would be perfectly smooth and could eliminate any noise or hum, or from power "spikes" from the on/off switching of other things in the building (i.e. the refrigerators in the kitchen, lights, etc.). As I do not know the current power cabling instalment (number of phases, outlets, the nearest transformers (if applicable), or if there is already a power conditioner for the entire building), it would be something to ask the Sound Engineer, as he would be able to verify, or to take this into consideration.
I will link this just as an example, so that people not into audio power conditioning will know what I am referring to.
-
Mic solution: still in discussion, possible candidate:
- Or the same as in the temple
- Choice of the mic is actually quite tricky as it needs to be "old-people" proof (two state only front button on/off) according to his experience.
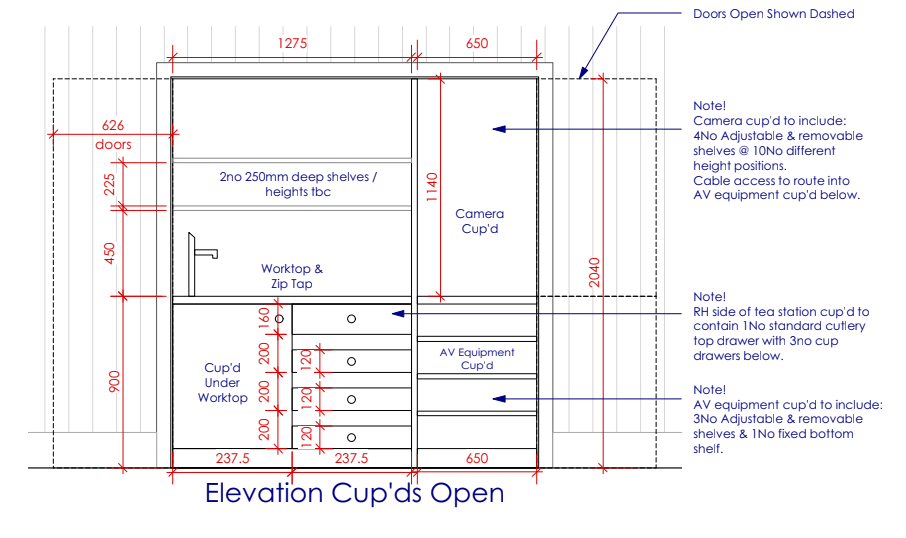
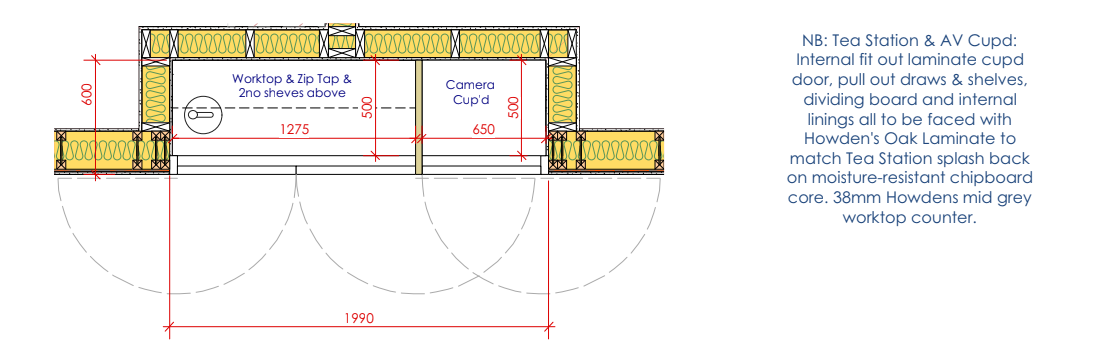
Initial Drawing
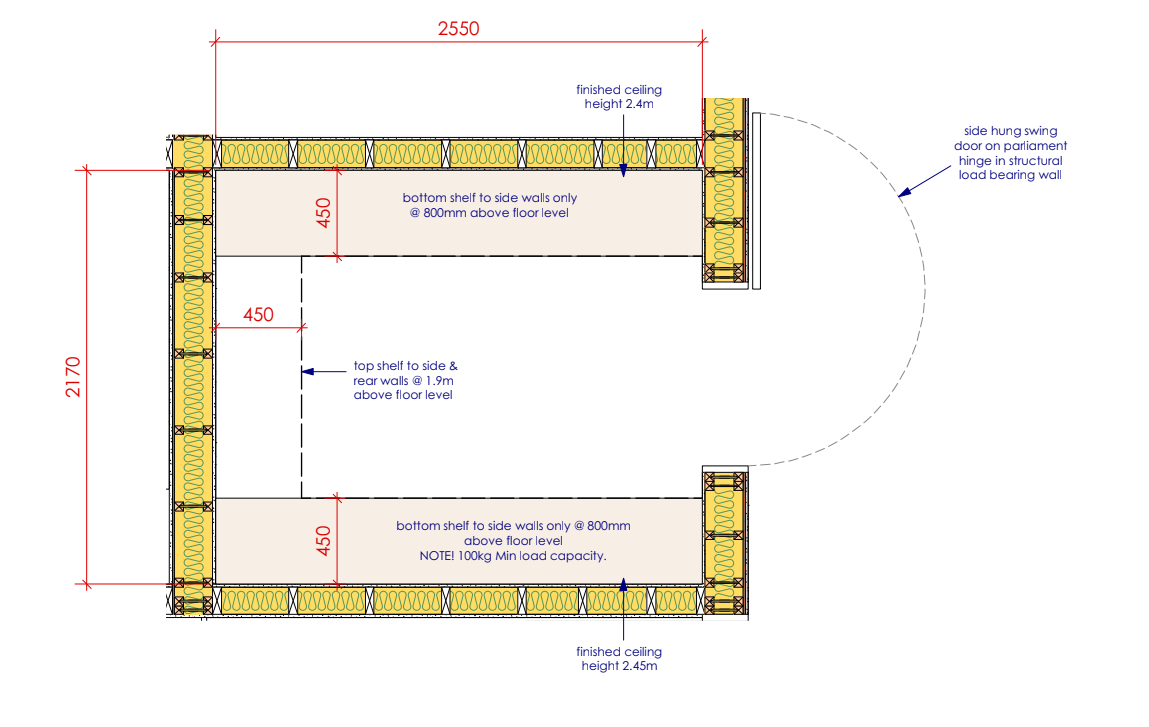
Actual measurement:

Camera Cup'd
Monk's Eating Area Cushion Cabinet (Where the PA system is)
Actual measurement:
